
Platform: Windows
Prerequisite: Basic Python, read this article and this article.
Introduction
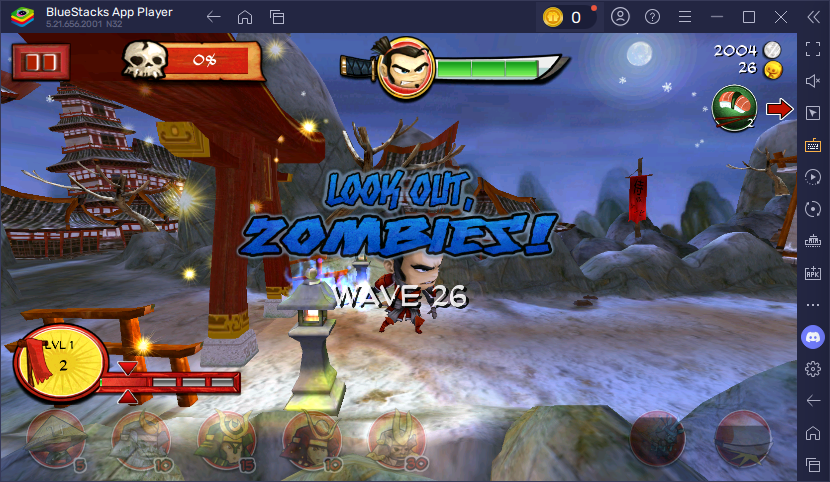
Today we will continue making the battle AI for game SvZ Defense. In this tutorial I will teach you how to read the level progress and leadership from game screenshots.

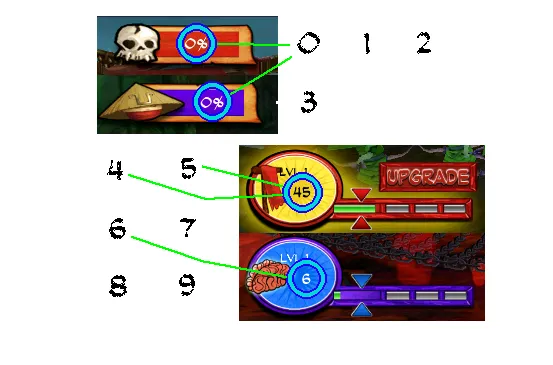
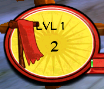
Level progress (Samurai side) We want to read number 0 from this image.
Leadership (Samurai side) We want to read number 2 from this image.
Level progress (Zombie side) We want to read number 0 from this image.
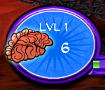
Leadership (Zombie side) We want to read number 6 from this image.
Observation
The very first thing we notice is that the font and typeface of the digits are the same. This means that it’s a good situation to apply template matching technique.
Things are looking very similar as the reading coins amount problem. Except that in the coins amount the numbers are clearly white-background-black-text.


where in this case the backgrounds are non-solid and the text have white or black color.


If we could come up with some way to convert them to white-background-black-text, we should be able to apply the same algorithm again to read the digits.
The Plan
Fair warning: this is going to be more difficult than it looks. Please be patient and follow each step carefully as you move on.
1 . The first thing we want to do is actually quantize the image (reduce the number of colors). If we got lucky we might even make the background completely solid after this step.


2 . Since we only care about the black and white colors, in this step we can enhance the black and white colors in our images. After enhancing them intensively we will get something like:


3 . We only want to work with white-background-black-text images. After the last step our images are mostly black, white, and gray. Therefore we can just invert the color for the black-background-white-text images.


4 . Convert the images to binary and we will end up with something very similar to before.


5 . On this point forward, we will work with the blobs again but we can’t just yet apply the algorithm we have from before. We will want to make sure that the digits blobs are not broken and remove all blobs that are just noises. It doesn’t benefit your understanding to explain them here so I will put them in the later parts of the tutorial.
6 . Now we have met every requirement. Apply the template matching algorithm and read the digits.
Step 1️⃣
Since this tutorial is going to be very long and potentially become hard to follow, this time I want to try something different.

Here are the two screenshots I used while I was developing the algorithm. This time I want you to first work with them before moving onto the real game. This ensures that we have the same environment and you will be adapting to your own environment much easier once your understand how it works.
Put the two screenshots in your project. Make sure your project have the following structure.
ai|___ player_hp| |___ ...|___ read_digit| |___ debug| | |___ samurai-read-digits-example.png| | |___ zombie-read-digits-example.png| |___ digits| |___ digit_recognizer.py| |___ reader.py|___ config.toml|___ ui_position.pyWe will be adding more files for debugging purposes via code.
In reader.py, put
import osimport reimport cv2import timeimport globimport numpy as npimport pytesseractfrom PIL import Imagefrom typing import Tuplefrom src.util.screen_getter import get_chosen_region, get_window_with_titlefrom src.ai.read_digit.digit_recognizer import Digit_Recognizerfrom src.ai.ui_position import leadership_bound_samurai, level_progress_bound_samuraifrom src.ai.ui_position import leadership_bound_zombie, level_progress_bound_zombie
script_dir = os.path.dirname(os.path.abspath(__file__))pytesseract.pytesseract.tesseract_cmd = 'C:\Program Files\Tesseract-OCR\\tesseract.exe'
class Reader: def __init__(self, window, bound): self._window = window self._bound = bound self._digit_recognizer = Digit_Recognizer(os.path.join(script_dir, 'digits')) self.debug = FalseIn ui_position.py, add
leadership_bound_samurai = [56, 357, 88, 373]level_progress_bound_samurai = [183, 51, 225, 69]leadership_bound_zombie = [62, 357, 94, 373]level_progress_bound_zombie = [188, 55, 230, 73]In digit_recognizer.py, put
import osimport cv2import globimport numpy as np
class Digit_Recognizer: def __init__(self, digits_folder): def load_binary(path): img = cv2.imread(path, cv2.IMREAD_GRAYSCALE) _, binary_img = cv2.threshold(img, 127, 255, cv2.THRESH_BINARY) return binary_img
self.digit_template = {}
# search for PNG files under digits folder png_files = glob.glob(os.path.join(digits_folder, "*.png"))
# extract filenames without extension filenames = [os.path.splitext(os.path.basename(file))[0] for file in png_files]
for filename in filenames: self.digit_template[filename] = load_binary(f'{digits_folder}/{filename}.png')
def recognize(self, digit_image): def mse(array1, array2): r = np.mean((array1 - array2) ** 2) return r if r != 0 else 0.001
similarities = [] for key, value in self.digit_template.items(): similarities.append(1 / mse(digit_image, value))
result = 0 highest = 0 for i in range(len(similarities)): if similarities[i] > highest: highest = similarities[i] result = i
return list(self.digit_template.keys())[result].split('_')[0]NOTE
Digit_Recognizeris mostly the same as before, except that I changed the way to load templates. Now you only have to name the template image files correctly (same naming conversion as before) in order to use this class.
In config.toml, put
[digit_reader]side = "samurai" # samurai / zombieNOTEWe won’t be using this file today.
In class Reader, add function
def extract(self): # region = get_chosen_region(self._window, self._bound) region = Image.open('debug/samurai-read-digits-example.png') region = region.crop(self._bound) processed_image = self._process_image(region)NOTEWe will be using the example image for now and will be later changed to reading from emulator.
Now write the function to process the image. This will be steps 1 - 4. Let’s start with step 1: quantize the image. Create a new function in Reader.
@staticmethoddef _process_image(img): def rescale_and_quantize(image: Image.Image, scaling_factor=2, quantize_factor=3) -> Image.Image: new_size = (image.width * scaling_factor, image.height * scaling_factor) image = image.resize(new_size, Image.Resampling.BILINEAR) return image.quantize(colors=quantize_factor, method=Image.Quantize.FASTOCTREE)
img = rescale_and_quantize(img, 2, 6) if self.debug: img.save('debug/quantized.png') return imgNOTEThe
rescale_and_quantize()function rescales and quantizes a given PIL image. I decided to scale up by a factor of 2 because I found out that it increases the chance of successful recognitions. I also set quantize factor to 6. That’s also from experience. In the real life scenario, you will often need to try out different values in order for things to work.
Now let’s test the code.
if __name__ == '__main__': reader = Reader(None, leadership_bound_samurai) # or 'level_progress_bound_samurai' for bound reader.debug = True reader.extract()Run this code and verify that you have quantized.png
if you used bound leadership_bound_samurai.
if you used bound level_progress_bound_samurai.
You can also test out the zombies side, but remember to change your test image path if you decide to do that.
HOORAY🎉 Congratulations on finishing up step 1.
Step 2️⃣
In this step we will enhance the black and white colors. We will enhance it to the extend that the resulting image will only contain white, black, and gray colors. In _process_image(), add
def enhance_black_and_white(image: Image.Image, factor=5) -> np.ndarray: grayscale = image.convert("L") image_array = np.array(grayscale, dtype=np.float32) image_array /= 255.0 # normalize image_array = (image_array - 0.5) * factor + 0.5 # increase contrast image_array = np.clip(image_array, 0, 1) # keep values in valid range image_array = (image_array * 255).astype(np.uint8) # convert back to 255 scale
return image_array
img = rescale_and_quantize(img, 2, 6)if self.debug: img.save('debug/quantized.png')img = enhance_black_and_white(img, 5)if self.debug: img.save('debug/enhance_black_and_white.png')return imgNOTE
enhance_black_and_white()takes a PIL image and returns a cv2 image. Notice that we will be working with cv2 images on this point forward. It first converts the image to grayscale and normalize the image to the range between 0 and 1. After that it increases the contrast by the given factor. In the end it converts the range back to between 0 and 255.
Run the driver code again and verify you have a new debug image.
HOORAY🎉 Good job completing step 2!
Step 3️⃣
This step is going to be a little tough. By this point we have images that are most white-background-black-text and black-background-white-text, but we only want white-background-black-text images. So the current task is really just to figure out if an image is black-background-white-text and invert it if yes.
To identify whether it has black-background, we can take the colors from the first row and the first column and calculate their mean. If it’s below the threshold the background would be black otherwise white.
Here is the code. Add it to _process_image()
def get_background_color(image: np.ndarray) -> Tuple[int, int, int]: # extract first row and first column first_row = image[0, :] # all pixels in the first row first_col = image[:, 0] # all pixels in the first column
# combine both sets of pixels combined_pixels = np.hstack((first_row, first_col))
# calculate the average color avg_color = np.mean(combined_pixels, axis=0).astype(int)
# determine if it's closer to white (255, 255, 255) or black (0, 0, 0) threshold = np.array([127, 127, 127]) # set to (255, 255, 255) if closer to white # otherwise (0, 0, 0) binary_color = (255, 255, 255) if np.all(avg_color > threshold) else (0, 0, 0)
return binary_color
def convert_to_white_bg(image: np.ndarray) -> np.ndarray: bg_color = get_background_color(image) if bg_color != (255, 255, 255): image = cv2.bitwise_not(image) return image
img = rescale_and_quantize(img, 2, 6)if self.debug: img.save('debug/quantized.png')img = enhance_black_and_white(img, 5)if self.debug: img.save('debug/enhance_black_and_white.png')img = convert_to_white_bg(img)if self.debug: img.save('debug/convert_to_white_bg.png')return imgNOTE
get_background_color()calculates the mean of the colors in the first row and first column in the image.convert_to_white_bg()inverts the image color if it’s black background.
Verify you have the debug image.
HOORAY🎉 Great! Onto step 4.
Step 4️⃣
This step is quite easy and we have done it before. Convert the image to binary. Add the following to _process_image().
def convert_to_binary(image: np.ndarray, threshold=30) -> np.ndarray: _, binary_array = cv2.threshold(image, threshold, 255, cv2.THRESH_BINARY) return binary_array
img = rescale_and_quantize(img, 2, 6)if self.debug: img.save('debug/quantized.png')img = enhance_black_and_white(img, 5)if self.debug: img.save('debug/enhance_black_and_white.png')img = convert_to_white_bg(img)if self.debug: img.save('debug/convert_to_white_bg.png')img = convert_to_binary(img, 30)if self.debug: img.save('debug/convert_to_binary.png')return imgAgain, verify you have the debug image.
HOORAY🎉 Things are looking well.
Step 5️⃣
🌶️ Be warned: this step is very long and complex, make sure you follow carefully.
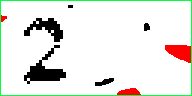
At the first glance, it looks like that we can apply template matching algorithm on our current image. However, that’s not true. Since the background was not solid, the digits are often read ‘broken’. Here is what I mean by that.
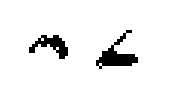
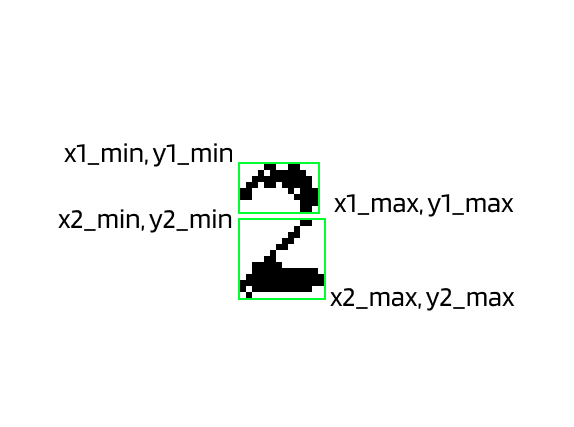
Zoom in our ‘2’ here and you will find out that it’s made with 2 blobs.
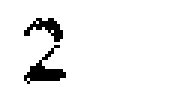
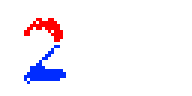
See the problem here? This means that instead digit ‘2’. It will be two blobs that makes no sense after you apply dfs. To visualize the problem:
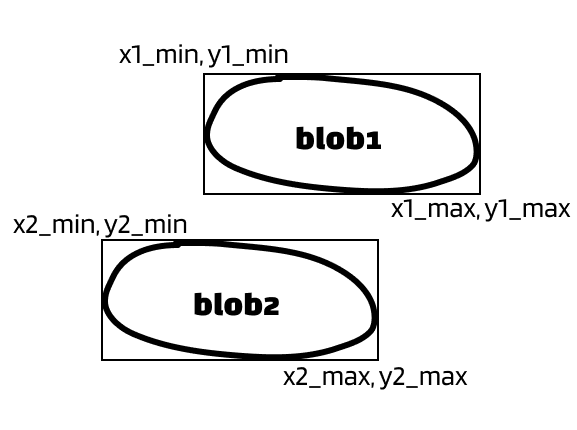
The solution: merge the blobs that belong to the same digit. Since we have the bounding box of each blobs, we can determine whether two blobs belong to the same digit by comparing their x values. It’s easier to explain with pictures. Let’s say we have two blobs that can form as a digit.
Situation 1:
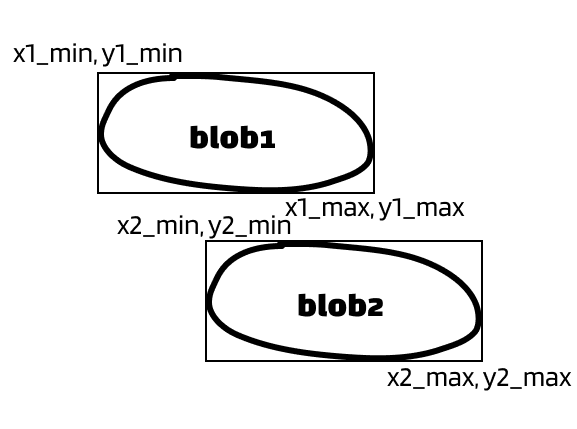
Situation 2:
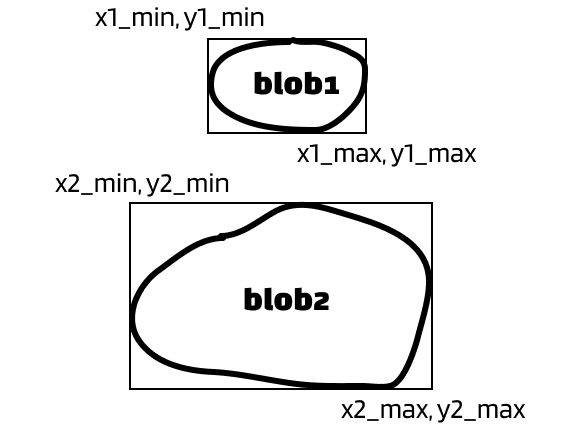
Situation 3:
Situation 4:
I want you to pay attention to their x-values. I hope you will agree with me that there’s overlaps in the x-values in all above situations. Whenever an overlap in x-value occurs, we want to merge two blobs.
EXERCISE
BTW, here is our ‘2’ example. Can you see which situation is this?
Ok, that was the most important problem I wanted to mention in this step. We still have other problems though, but not as hard to understand as that one.
Here is the plan:
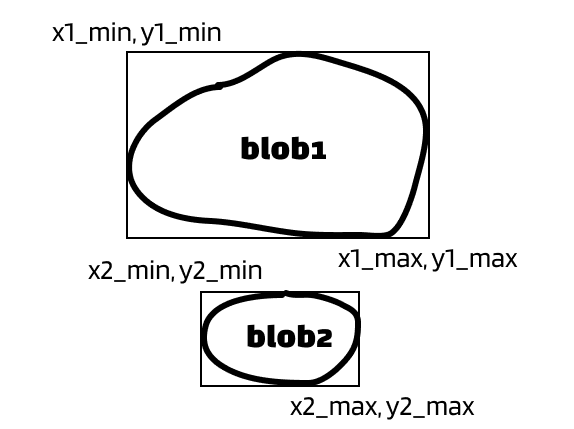
1 . Read the blobs with bounding box. We have done this before.
2 . Although unlikely, we need to remove all blobs that touches the edge of the image. These blobs are nearly impossible to be digits and will mess up the result if they exist.
3 . We want to remove noises from the image. These are small blobs that are not very likely to be part of digits or just insignificant.
4 . We want to merge the blobs. Just like discussed previously.
5 . By this point each blob should represent a digit (or text). We want to filter out blobs that don’t meet the minimum height.
6 . We want to remove small blobs that are not likely to be valid by their area.
After we finish all these steps, we can treat the image the same as before and apply template matching.
Let’s start by finding the blobs along with their bounding boxes. We have already discussed the code before so I won’t explain again. If you want to review please read this. Add the following to Reader.
def _find_blobs_with_bounding_box(self, binary_img): result = []
# visited array to track processed pixels visited = np.zeros_like(binary_img, dtype=np.uint8)
# iterate through each pixel in the binary image h, w = binary_img.shape for y in range(h): for x in range(w): if binary_img[y, x] == 0 and visited[y, x] == 0: # extract the blob using DFS and get its bounding box blob_mask, min_x, max_x, min_y, max_y = self._dfs(x, y, binary_img, visited) # append the blob mask and bounding box to the list result.append((blob_mask, min_x, max_x, min_y, max_y))
# sort blobs by their x-coordinate (left-to-right order) result.sort(key=lambda b: b[1]) # sort by min_x
# return only the blobs return result
@staticmethoddef _dfs(x, y, binary_img, visited): assert binary_img[y, x] == 0, "starting position is not black"
directions = [(-1, -1), (-1, 0), (-1, 1), (0, -1), (0, 1), (1, -1), (1, 0), (1, 1)]
h, w = binary_img.shape stack = [(x, y)] min_x, max_x, min_y, max_y = x, x, y, y # track bounding box
# create a white background to store the blob blob_mask = np.full_like(binary_img, 255, dtype=np.uint8)
while stack: cx, cy = stack.pop() if 0 <= cx < w and 0 <= cy < h and binary_img[cy, cx] == 0 and visited[cy, cx] == 0: # mark the pixel as visited visited[cy, cx] = 1 # paint position (cx, cy) in blob_mask blob_mask[cy, cx] = 0
# update bounding box min_x, max_x = min(min_x, cx), max(max_x, cx) min_y, max_y = min(min_y, cy), max(max_y, cy)
# push all nearby 8 neighbors for dx, dy in directions: nx = cx + dx ny = cy + dy stack.append((nx, ny))
return blob_mask, min_x, max_x, min_y, max_yNext, use them in the function extract().
def extract(self): region = get_chosen_region(self._window, self._bound) processed_image = self._process_image(region)
blobs_with_bounding_box = self._find_blobs_with_bounding_box(processed_image)Next, we’ll be removing all blobs that touches the edge of the image. To visualize:
All red blobs will be removed. All black blobs will be preserved.
The code is surprisingly short since we have the bounding boxes.
@staticmethoddef _remove_edge_touching_blobs(blobs, image_width, image_height): # keep only blobs that do not touch any of the image boundaries filtered_blobs = [ (blob_mask, min_x, max_x, min_y, max_y) for blob_mask, min_x, max_x, min_y, max_y in blobs if min_x > 0 and min_y > 0 and max_x < image_width and max_y < image_height ]
return filtered_blobsAdd this to extract().
height, width = processed_image.shape[:2]filtered_blobs = self._remove_edge_touching_blobs(blobs_with_bounding_box, width, height)Next, we want to remove all the noises (tiny blobs) from the image. Since each blobs is a np array of 0s and 1s, this is also quite easy.
@staticmethoddef _remove_small_blobs(blobs, min_size): # keep only blobs with at least `min_size` black pixels (0) filtered_blobs = [ (blob_mask, min_x, max_x, min_y, max_y) for blob_mask, min_x, max_x, min_y, max_y in blobs if np.sum(blob_mask == 0) >= min_size ]
return filtered_blobsNOTEWe get the sum of the 0s (black colors) in a blob and compare that with our threshold.
Add this to extract().
# removes small blobs that aren't likely to be part of digitsfiltered_blobs = self._remove_small_blobs(filtered_blobs, 7)Here comes the challenge part: merging the blobs.
First of all, add a new function in Reader.
def _merge_blobs(self, blobs, max_digit_width=23):Inside _merge_blobs(), add
def get_merge_to(merge_list, blob): for i in range(len(merge_list)): x1i = blob[1] x1a = blob[2] x2i = merge_list[i][1] x2a = merge_list[i][2]
if x1i <= x2i <= x1a <= x2a: if x2a - x1i <= max_digit_width: return i elif x2i <= x1i <= x2a <= x1a: if x1a - x2i <= max_digit_width: return i elif x2i <= x1i <= x1a <= x2a: if x2a - x2i <= max_digit_width: return i elif x1i <= x2i <= x2a <= x1a: if x1a - x1i <= max_digit_width: return i
return -1NOTEThis function determines the first mergable blob from the list for a given blob. This is also the code interpretation for the four situations we stated in the beginning of this step.
Inside _merge_blobs(), add another function
def merge_blobs(blob1, blob2): def crop_and_paste_blob(mask, blob_mask, min_x, max_x, min_y, max_y): # Step 1: Crop out the relevant blob region from its original mask cropped_blob = blob_mask[min_y:max_y + 1, min_x:max_x + 1]
# Step 2: Compute position where the blob should be placed in merged_mask y_offset = min_y # adjust for new coordinate system x_offset = min_x
# ensure pasting does not go out of bounds paste_y1 = max(0, y_offset) paste_x1 = max(0, x_offset) paste_y2 = min(paste_y1 + cropped_blob.shape[0], mask.shape[0]) paste_x2 = min(paste_x1 + cropped_blob.shape[1], mask.shape[1])
# ensure cropping of `cropped_blob` to match pasting area crop_y1 = 0 crop_x1 = 0 crop_y2 = paste_y2 - paste_y1 crop_x2 = paste_x2 - paste_x1
# Step 3: Paste the cropped blob into merged_mask, keeping black pixels (0) mask[paste_y1:paste_y2, paste_x1:paste_x2] = np.minimum( mask[paste_y1:paste_y2, paste_x1:paste_x2], cropped_blob[crop_y1:crop_y2, crop_x1:crop_x2] )
return mask
# extract masks and bounding boxes mask1, min_x1, max_x1, min_y1, max_y1 = blob1 mask2, min_x2, max_x2, min_y2, max_y2 = blob2
# compute new bounding box that encloses both blobs new_min_x = min(min_x1, min_x2) new_max_x = max(max_x1, max_x2) new_min_y = min(min_y1, min_y2) new_max_y = max(max_y1, max_y2)
# create an empty white mask (255) of the new size merged_mask = np.ones(mask1.shape[:2], dtype=np.uint8) * 255 merged_mask = crop_and_paste_blob(merged_mask, mask1, min_x1, max_x1, min_y1, max_y1) merged_mask = crop_and_paste_blob(merged_mask, mask2, min_x2, max_x2, min_y2, max_y2)
return merged_mask, new_min_x, new_max_x, new_min_y, new_max_yNOTEThis is the actual function that does the merging. Basically, it creates a new image, then copy-and-pastes
blob1andblob2into it.
Before we continue, add this function in Reader.
@staticmethoddef _clear_folder(path): files = glob.glob(os.path.join(path, '*')) for file in files: try: os.remove(file) except Exception as e: print(f"Error deleting {file}: {e}")This function clears out all files under the given path. We will be using it for debugging purposes.
Go back to _merge_blobs(), add
if self.debug: os.makedirs('debug/merged', exist_ok=True) self._clear_folder('debug/merged')
# [(blob_mask, min_x, max_x, min_y, max_y)]merged = []processed = 0while processed < len(blobs): curr = blobs[processed]
merge_to = get_merge_to(merged, curr) if merge_to != -1: # merge curr to merged merged[merge_to] = merge_blobs(merged[merge_to], curr) if self.debug: cv2.imwrite(f'debug/merged/{processed}.png', merged[merge_to][0]) else: # add curr to merged merged.append(curr)
processed += 1
return mergedNOTEWe created a specific folder to store the images of merged blobs. After that, we iterate through all blobs and merge all mergable blobs. In each step, if the current blob has no mergable, add it to
mergedlist, otherwise merge them and add that tomerged. Repeat until we reach the count of blobs.
Don’t forget to use this function in extract().
# merge blobs (digits could be 'cut off' and we need to merge them)filtered_blobs = self._merge_blobs(filtered_blobs)If you run the driver code now, you should expect to see a new debug image.

The image won’t be saved to merged if you used bound ‘level_progress_bound_samurai’ because the digit in this image is connected.
The rest of this step is easy. Now we will remove all blobs that don’t meet the height requirement.
Add the following in Reader.
@staticmethoddef _filter_out_blob_masks_not_meeting_height(blobs, min_height=15): filtered_blobs = [ (blob_mask, min_x, max_x, min_y, max_y) for blob_mask, min_x, max_x, min_y, max_y in blobs if max_y - min_y >= min_height ]
return filtered_blobsNOTESince we have bounding boxes, this is simple to do. The
max_ysubtractsmin_yis the height of the blob.
Use this function in extract().
# removes blobs that aren't likely to be digitsfiltered_blobs = self._filter_out_blob_masks_not_meeting_height(filtered_blobs)The end of this step. We don’t need to add new function. Add the following in extract().
# removes blobs that aren't likely to be digitsfiltered_blobs = self._remove_small_blobs(filtered_blobs, 30)HOORAY🎉 Almost there!
Step 6️⃣
As said in the beginning, this step has no new stuff and we just need to apply template matching algorithm on our images.
Add the following in Reader.
@staticmethoddef _remove_blob_background(blob_with_bounding_box): blob_mask = blob_with_bounding_box[0] min_x = blob_with_bounding_box[1] max_x = blob_with_bounding_box[2] + 1 min_y = blob_with_bounding_box[3] max_y = blob_with_bounding_box[4] + 1 return blob_mask[min_y:max_y, min_x:max_x]In extract(), add
blobs = []for blob_with_bounding_box in filtered_blobs: # put the blob to the center of a 24x24 image blob = self._remove_blob_background(blob_with_bounding_box) blobs.append(self._edit_blob_canvas(blob, 24, 24))
if self.debug: os.makedirs('debug_digit', exist_ok=True) self._clear_folder('debug_digit')
count = 0for blob in blobs: if blob[0]: # if blob doesn't exceed our defined size if self.debug: cv2.imwrite(f'debug_digit/{count}.png', blob[1]) count += 1
result = ''for blob in blobs: if blob[0]: # if blob doesn't exceed our defined size extracted_text = self._digit_recognizer.recognize(blob[1]) else: extracted_text = pytesseract.image_to_string(blob[1], config='--psm 6') match = re.search(r'\d+', extracted_text) if match: extracted_text = match.group() else: extracted_text = '0'
if extracted_text.isdigit(): result += extracted_text
return int(result) if result else 0Don’t forget that we haven’t yet filled the digits folder. You can use mine for now. Add these to digits.


Run the driver code with ‘leadership_bound_samurai’. You should see the result:
2Run with ‘level_progress_bound_samurai’:
0After you confirmed the result, change the top three lines in extract() to
def extract(self): region = get_chosen_region(self._window, self._bound) # region = Image.open('debug/samurai-read-digits-example.png') # region = region.crop(self._bound)Next, change the driver code.
if __name__ == '__main__': chosen_window = get_window_with_title('BlueStacks App Player') reader = Reader(chosen_window, leadership_bound_samurai) reader.debug = True while True: print(reader.extract()) time.sleep(0.5)Open the game, play as Samurai. Check if the program is really reading the leadership value. If not, your bounding box is very likely to be different from mine. The easiest fix is to use the same setup as mine. In window_rescaler.py, make sure your boundary looks like this:
top, bottom, left, right = 0, 482, 0, 819If not, adjust the values and run window_rescaler.py. If the problem still persists or you want to use your own setup, you will have to use mouse_coordinator.py to read the boundary for leadership and level progress. Good luck!
HOORAY🎉 That’s the end of this tutorial! It should work for both samurai and zombie side as long as your bounding boxes are correct. Stay tunned for more!
💗 If you liked this blog, consider following me on GitHub.
🍯 Happy Coding 🍯